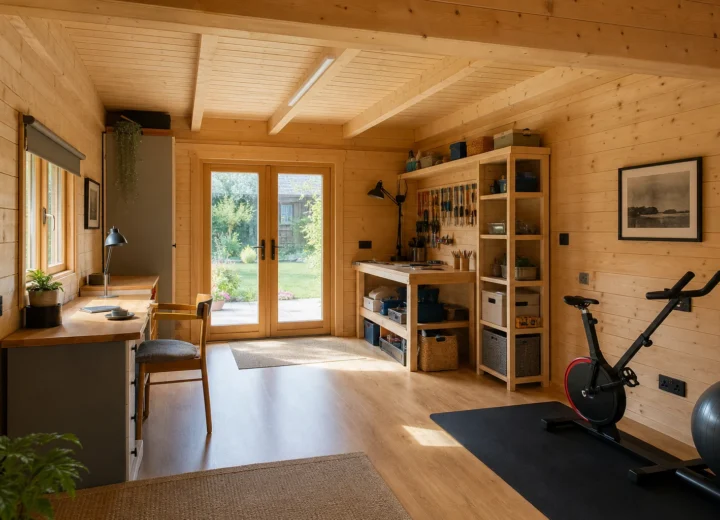

The right summer house size depends on how you will use it, the furniture that needs to fit, space to move comfortably, the garden available and the delivery and installation route.
A building can fit within a measured rectangle and still disappoint. A door may open into the only practical seating position, a table may leave no clear route through the room, or the internal floor area may be smaller than expected once wall construction, lining and storage are taken into account.
This guide focuses on choosing a practical footprint and testing a layout before ordering. For wider advice on specifications, buying, insulation, maintenance and the UK planning picture, see our complete guide to summer houses in the UK.
What you need before choosing a summer house size
- A tape measure or laser measure.
- The dimensions of furniture you already own or intend to buy.
- A rough plan of the garden, including paths, trees, fences, drains and changes in level.
- Masking tape, string, canes or a hosepipe for marking out the proposed building.
- A supplier’s dimensioned drawing before placing an order.
Do not rely on labels such as “compact”, “large” or “family-sized”. Ask for the external footprint, internal dimensions, roof projection, door and window positions, plus any veranda, steps or guttering.
Step 1: Start with the job the summer house needs to do
Choose the use before the footprint. A quiet reading room, craft space and garden entertaining room can require very different layouts, even where the outside dimensions are similar.
| Intended use | Plan around | Common pressure on space |
|---|---|---|
| Relaxed seating | Chairs or a sofa, side table, clear entry | Door swing and circulation around seating |
| Dining | Table, chairs when pulled out, serving area | Space needed behind occupied chairs |
| Hobbies and crafts | Work surface, task lighting, material storage | Permanent storage taking over the floor |
| Storage with seating | Cabinets, shelves, bikes or garden equipment | Keeping stored items separate from the seating area |
| Entertaining | Flexible seating, drinks surface, easy movement | Creating a route through a crowded room |
| Occasional desk use | Desk, chair movement, power and ventilation | Comfort in colder or warmer periods |
Write down the primary use and one likely future use. This avoids a narrow brief, such as “somewhere to sit”, producing a room that cannot later accommodate a desk, hobby table or visiting family.
Step 2: Measure the garden space you actually have
Measure the proposed site, not just the widest empty part of the garden. Include the space around the building affected by the roof, doors, maintenance access and the way people move through the garden.
- Measure the maximum length and width available at the proposed position.
- Mark fences, walls, planting beds, mature trees, paths, drains, taps and changes in level.
- Note where the sun falls at the times you expect to use the building.
- Consider privacy from neighbouring windows and sightlines back to the house.
- Mark the proposed footprint at full size with tape, string or canes.
- Live with the marked-out area for a few days if possible. Walk around it, use the path and view it from the house.
This full-size test can be more useful than a small sketch. It reveals whether a larger building interrupts a route to the shed, dominates a modest lawn or leaves an awkward strip of garden that is difficult to maintain.
Step 3: Understand the difference between external and internal size
The advertised footprint usually describes the building’s outside dimensions, not necessarily the clear floor area inside. Wall thickness, structural framing, internal lining, insulation and fitted finishes can all reduce the space available for furniture.
Also check what sits outside the nominal footprint. Roof overhangs, gutters, verandas, door steps and opening doors can affect where the building can be positioned and how it works in use.
- External footprint: the space occupied by the building structure, as specified by the supplier.
- Internal floor area: the usable space inside the finished walls.
- Overall projection: parts extending beyond the walls, such as eaves, gutters, a veranda or steps.
- Operational space: the area needed to open doors, maintain the exterior and move people or furniture.
Request a dimensioned plan and elevation. If year-round use is part of the brief, ask how the quoted internal dimensions change after insulation and lining are fitted.
Step 4: Build the layout around real furniture
For seating or dining, measure the actual furniture first, then allow space for people to use it. There is no reliable universal allowance because chair styles, table shapes, door positions and household habits vary. A layout that technically contains every item may still feel cramped.
- Make a list of everything intended to stay in the room, including shelves, a heater, bins, cushions and hobby equipment.
- Measure the width and depth of each item.
- Draw the internal outline of the proposed building to scale, including doors and windows.
- Place the furniture on the plan and show how doors open.
- Leave clear routes from the entrance to seating, storage and windows.
- Try a second layout. It may show that a different door position or slightly different footprint works better.
For a physical test, use cardboard rectangles or masking tape on a patio, garage floor or lawn. Mark the outside edge of a sofa, table and desk, then walk the routes you would normally use.
Allow for access and movement
Plan for the space used while furniture is in use, not only its resting position. Dining chairs need room when occupied. A desk chair needs room to move. A storage cupboard needs space to open. A pair of French doors can create a useful connection to the garden, but their opening arc must not conflict with chairs or a table.
Think about carrying a tray out of the house, bringing cushions in during bad weather and moving a larger item of furniture through the doorway. Such details determine whether the room feels practical on an ordinary day.
Plan for the items that quietly consume floor area
Storage is often missing from a first layout. Gardening tools, folded chairs, hobby materials, books, a vacuum, electrical equipment and seasonal decorations need a home. Built-in or wall-mounted storage may preserve more floor area than freestanding units, but it should still appear on the plan.
If the summer house will include heating, electrics or a compact kitchenette-style drinks area, decide where the equipment will sit before finalising the size. A wall that looks spare on a brochure plan may be needed for sockets, a radiator, shelving or ventilation.
Step 5: Use size categories as planning prompts, not fixed standards
Summer house sizes are often described in nominal imperial dimensions, such as 8 x 6 ft, alongside metric measurements. These labels are useful for comparison, but they are not standardised descriptions of usable space. Construction details, door placement and the stated measurement basis can differ between suppliers.
Use these broad categories to frame your thinking rather than treating a named size as a guarantee:
- Smaller footprints: can suit a simple chair-and-table arrangement, compact hobby use or storage-led use. Door and furniture choices matter greatly.
- Medium footprints: can offer more flexibility for seating, a small table or a dedicated hobby surface, provided the layout retains a clear route through the room.
- Larger footprints: can support separate zones, such as seating plus dining or a desk plus storage. They also take more garden space and may demand more from the base, access route, heating and maintenance plan.
The useful comparison is not small versus large. It is whether the finished internal layout supports your intended use without sacrificing the rest of the garden.
Step 6: Match the footprint to the way you will use it
Compact seating room
For a compact seating room, start with the number and type of seats, then plan an unobstructed route from the door. A smaller summer house can work well for occasional relaxation if it avoids bulky furniture and has sensible storage. Prioritise comfortable seating over trying to fit too many separate pieces.
Dining and entertaining
The best size for entertaining depends on the table, chairs and number of people expected to use the room at once. Draw the table with chairs pulled out, not tucked in. Allow a route to the door and somewhere for drinks, food or coats. If gatherings are a main aim, flexibility often matters more than fixed furniture.
Hobbies and craft work
Choose a footprint around the work surface and material storage. A hobby room can feel restrictive when tools or supplies have to be packed away before every session. Consider daylight, task lighting, ventilation and a wall for shelving as part of the size decision.
Storage with seating
If a summer house must hold garden equipment as well as provide somewhere to sit, divide the room deliberately. A storage wall, screened corner or separate external store may be more effective than allowing equipment to spread into the seating area.
Occasional garden office use
A small summer house may work for occasional desk use if its finished internal dimensions accommodate the desk and chair, and the building has suitable insulation, ventilation, power and heating for the periods you intend to work there. Do not assume every summer house is comfortable or appropriate for regular year-round office use.
If work will be a substantial use, read our guide on choosing a garden office size for one or two people and consider the broader requirements for a garden office.
Step 7: Check delivery and installation access before ordering
A suitable footprint is only useful if the building, its materials and the installation team can reach the base. Trace the route from the road, driveway or delivery point to the final position.
- Measure the narrowest gate, side passage and path.
- Check corners and turning points, not only straight widths.
- Look for steps, steep slopes, soft ground and loose surfaces.
- Identify low branches, overhead cables, porches and other obstructions.
- Consider where panels, timber, tools and waste can be placed during installation.
- Ask the supplier how the building will arrive and whether components can be carried through the available access.
Do this before paying a deposit. Access limitations can affect the design, installation method and total scope of the project.
Step 8: Treat the base and specification as part of the size decision
The base should suit the building and the site. A level, stable base supports correct assembly and helps doors and windows operate as intended. Ground conditions, drainage, slopes and the building’s construction all matter, so plan the base before ordering the building.
Specification also affects usable space. Thicker walls, insulation, internal lining, storage, electrical fittings and heating equipment can alter the clear internal area and layout. A basic summer building used mainly in warmer weather may need a different specification from a garden room intended for regular use across the year.
For a fuller discussion of base choices and installation planning, see our guide to garden building foundations and base options.
Step 9: Check planning permission and building regulations for the proposed size
Yes, size can affect planning permission and building regulations, but it is only one of several factors. Height, position, distance from boundaries, intended use, site restrictions and the type of property can also be relevant.
Rules are not uniform across the UK. England, Wales, Scotland and Northern Ireland have separate planning systems, and local circumstances can change the answer. Listed buildings, conservation areas, leasehold terms, restrictive covenants and other site-specific conditions may require additional checks.
Check current official guidance for the nation where the property is located before ordering, particularly if the proposed building is substantial, near a boundary, intended for regular work, includes services or may be used for sleeping. Do not assume that permitted development rules in England apply elsewhere in the UK.
For a focused overview of the questions to raise for a more substantial outbuilding, see garden room planning permission by UK nation and when building regulations approval may be needed for a garden room.
Step 10: Decide whether a bigger summer house is genuinely better
No. A larger summer house can provide a more flexible layout and allow for future changes, but it is not automatically the best choice. It may take a larger share of the garden, require a more substantial base, increase the area to heat and maintain, and create delivery, installation or regulatory complications.
A smaller building can feel purposeful and attractive when its layout is disciplined. A larger one is worthwhile when it solves a real requirement, such as a separate dining area, a substantial hobby bench, storage that cannot move elsewhere or regular use by several people.
Compare the whole project, including foundations, installation, electrics, heating, ventilation and maintenance. The purchase price alone does not show the long-term practical difference between two footprints.
Common mistakes when choosing summer house sizes
- Buying from the external dimensions alone: always check the finished internal measurements.
- Planning furniture without movement space: test doors, chairs, cupboards and routes through the room.
- Forgetting roof and door projections: these can affect clearances, maintenance and the usable garden area.
- Leaving storage until later: the result is often a seating area used as a store.
- Ignoring the delivery route: access needs checking before the design is fixed.
- Choosing the largest footprint available: assess the effect on light, lawn, paths and the balance of the garden.
- Assuming all UK rules are the same: confirm current requirements for the relevant nation and property.
- Specifying a summer building for year-round work without reviewing comfort: insulation, heating, ventilation and electrics can be as important as floor area.
A practical summer house sizing checklist
- Define the main use and a likely future use.
- List all furniture, storage and equipment that must remain inside.
- Measure those items and draw a scaled internal layout.
- Test door swings, windows, chair movement and circulation routes.
- Mark the external footprint in the garden at full size.
- Check the roof projection, steps, maintenance access and garden routes.
- Measure the delivery and installation route from the entrance to the base.
- Confirm the base design is suitable for the building and site conditions.
- Check how insulation, lining, electrics and heating affect internal space.
- Confirm current planning and building regulation requirements before ordering.
Choose the layout before the label
Start with a marked-out footprint and furniture plan, then compare products against the same practical brief. The right summer house size gives you a comfortable internal layout, fits the garden without overwhelming it and can be delivered, installed and used as intended.
Once the footprint is clear, return to our complete UK summer house guide for help comparing construction, insulation, foundations, planning considerations and buying options.